Kenny Oprins
For this cinematic
my jobs were to build the lighting set up, create the underwater
aesthetics and figure out a fish system that would populate the
background with a variety of aquatic life.
The Lighting set up
The lighting set up is actually very basic, it consists out of 2 directional lights and an upscaled pointlight.
These were actually the only base lights needed for set up. To gain more clarity and a broader spectrum we activated Global Illumination and Final Gathering on tweaked settings.
The Underwater Aesthetics
For the underwater feeling there were several factors required that when combined would give a desired outcome.
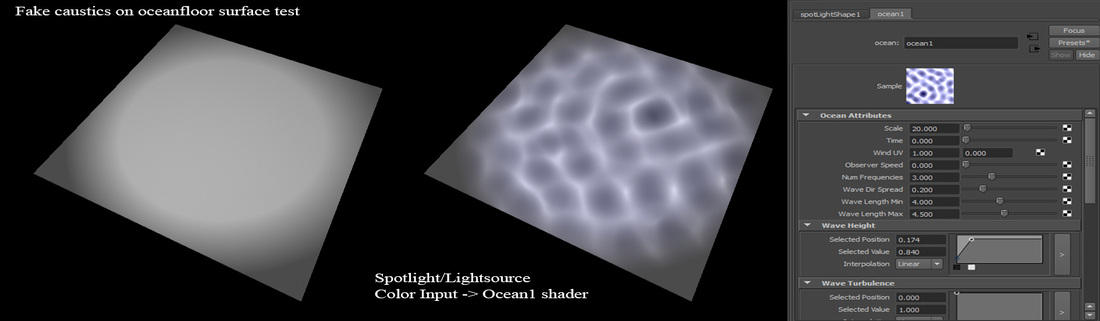
Caustics
While researching and test rendering caustic effects we discovered that true caustics were highly expensive to rendering time. With an empty scene and only a single small caustic effect it already took over 30 minutes to render one frame of true caustics.
To solve this problem we agreed on faking the caustics by linking one of the directional lights with an Ocean texture. This resulted in a projected caustic pattern on the ocean floor with little to no expense on the rendering time.
The only thing missing from this result were the shimmering rays that are a result of light fractioning when going through the water surface.
For the underwater feeling there were several factors required that when combined would give a desired outcome.
Caustics
While researching and test rendering caustic effects we discovered that true caustics were highly expensive to rendering time. With an empty scene and only a single small caustic effect it already took over 30 minutes to render one frame of true caustics.
To solve this problem we agreed on faking the caustics by linking one of the directional lights with an Ocean texture. This resulted in a projected caustic pattern on the ocean floor with little to no expense on the rendering time.
The only thing missing from this result were the shimmering rays that are a result of light fractioning when going through the water surface.
However, in Adobe After Effects there is a plug-in called: Shine, that creates the exact same shimmering effect with no cost whatsoever for production time.
Just mask out the ocean, isolate it in Adobe and you can set the spawn above it and it will project the shimmering effect to any direction/intensity/range you want.
Fog
Pretty straight forward, a Maya generated Fog Sphere has been set into the scene that would decrease clarity of the ocean making things murkier when further towards the back of the scene.
Also dimmed the lighting and gave the lights a softer look.
Water surface/ceiling
The Ocean from the Fluid Dynamics is used to create the water surface/ceiling of the cinematic. The values for size and heights of the waves are adjusted to match the scale of the scene.The Pointlight is used to give a glow to the surface and it overall lightens up the scene and creates a soft bloom.
Shimmering dirt particles
The dirt particles were created in Adobe After Effects.
Camera tracking was used to calculate the shot, doing this made the particles move with the camera angles and not breaking the effect of it being a fake 2d render placed on top.
Small details such as shimmering and a tiny glow were simply added in the Adobe attribute editor. The shimmering was made by jittering the opacity of each particle over its lifespan making it look like they are rotating and moving in different angles.
Rendering them out in a PNG sequence and overlaying them in Composite gave a nice result, combining a Zdepth pass from the environment renders to them would make it possible to get the particles behind and in front of the characters adding another layer of depth.
The background fish system
The fish in the background are guided particles with fish models instanced to it.
A Nurbs curve is drawn through the scene and has its own particle shape which has this curve set as their goal.
Emitters located at the start of the curves will spawn particles.
In order to make the particles follow the curve some rules had to be created.
In ParticleShape under the Per Particle Attributes we add a GoalU and attach a default ramp that covers the lifespan of the particles to it. The Lifespan of the particles will now determine the speed of the particles, which could also be randomized for variety.
Adding another rule in the PPA tab will let us set an offset to the curve, this can be done by creating a goalOffset and give it the expression of <object name> = sphrand (1);
Doing this will cause the particles to slide over the CVs of the curve with a random offset between 0 and 1 of the curve, creating a flow of particles that could resemble a school of fish.
The final step was to instance the fish model to the particle, give them the correct rotation by adjusting the Aim Direction from None to World Velocity and we have a simple system that spawns fish that follow a guided curve.
Setting keys for the emit rate will allow for a controlled spawn of fish on desired frames.
