Richard Saffrie
Originally I was focused on environment creation but later on in the project I was responsible for the final HD renders and compositing.
The environment
I worked on the environment together with Stan, while he was sculpting the terrain in Zbrush I was looking into a solution for the creation of coral. Modeling everything by hand would have been inefficient so that is why I decided to use Houdini to procedurally generate most of the geometry.
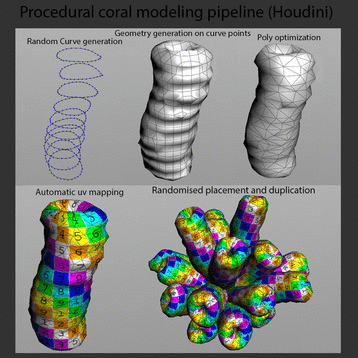
After generation various types of coral in Houdini, I started placing them in the scene in Maya. All the coral assets had automatically generated UV's which were utilized by the procedural textures I created in Maya.


During the production rendering process it became apparent that the coral was very taxing and in some scenes bumped the rendertime to over an hour per frame. To remedy this problem I rendered corals onto planes and populated large areas of the background with them. This greatly reduced the polycount and amount of shader calculations.
Rendering
There were a number of issues that came with rendering an underwater environment. The lighting in this scene was quite taxing and required high quality final gather calculations. The fact that the sea caustics were moving all the time also meant that final gathering had to be recalculated for every frame.
Some effects such as subsurface scattering were faked with shaders to further minimize render times.
Due to the complexity of the coral models, polycounts were a big issue. In the end I chose to divide every shot into a separate scene to minimize elements from other shots. This greatly reduced RAM usage and in some cases reduced render times by 40 minutes per frame.
With further optimizations in the render settings I was able to reduce the render times to 10-20 minutes per frame. This was acceptable but it still took over a month of rendering and scene work to achieve the full background cinematic.
Compositing
When I was rendering the shots I divided the rendering task into background and foreground. The background being the entire environment and the foreground being the mermaid, the fish and everything they interacted with.
My composite setup was quite simple, the main operations were the addition of the foreground elements. These were added separately by using masks and gave me more specific control over the separate elements.
The background composite had a zdepth pass which was used to create a depth of field effect. I also used the zdepth pass to desaturate the background. another post effect is a subtle amount of lightrays coming from the ocean surface. I separated the ocean from the environment by using an inverted environment mask and added various operations to it to achieve the effect.
The background composite had a zdepth pass which was used to create a depth of field effect. I also used the zdepth pass to desaturate the background. another post effect is a subtle amount of lightrays coming from the ocean surface. I separated the ocean from the environment by using an inverted environment mask and added various operations to it to achieve the effect.
Once the background and foreground elements were added and color balanced I added small floating particles on top of them. Kenny rendered and simulated these in After Effects. I made sure that the larger particles were added on top of the mermaid and fish. The smaller ones were only added to the background, this helped achieve more depth to the final composite.
Once the background and foreground elements were added and color balanced I added small floating particles on top of them. Kenny rendered and simulated these in After Effects. I made sure that the larger particles were added on top of the mermaid and fish. The smaller ones were only added to the background, this helped achieve more depth to the final composite.
